Posts

Cockpit Refurb - Part 2

Image
This was only expected to be a short exercise to clean up the dash and fit the Sony head unit that came with the car - albeit in a box in the boot. A previous poor re-installation of the electrics and a new enhancements of my own design have lengthen the task somewhat. I have now (eventually) put the dash back together. I picked up a second hand voltage gauge and warning light cluster from the Triumph show and Stoneleigh a few weeks ago. So these are now in place and working nicely. My glove box USB charging points are also in place along with a secondary ignition key. This will act as a simple deterrent against casual theft, as it switches off the ignition if the key is switched off or removed, and is hidden in the locked glovebox. 
Rear Tub Refurb

Image
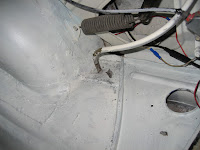
With all of the seats removed for refurbishment its a good time to put a generous coat of epoxy mastic 121 paint on the inside of the tub. Having given the tub a good rub down / wire brush to clean off the flaky stuff I noticed something not right. Both of the tonneau drainage tubes have been directed into the cavity between the inner and outer wings. That means that any rain-water ending up in the tonneau drainage tray would be directed to fill up this cavity. Not only would the car fill with water but it would simply rust from the inside out.  I can see what has happened, and it seems to be a common problem. Replacement panels don't come with the hole pre-drilled and it's not an intuitive place to put a water drainage pipe - inside the car (although the MX-5 does something very similar). I have seen mention on the Stag forum that there is a steel tube that should fit through the boot floor that these drain pipes connect to. I can't find these tubes in any parts supplier&

LED Bulb Replacement

Image
Whilst the dash is in bits I might as well replace the old filament bulbs with some modern alternatives. A few reasons: a) they are brighter than the originals, b) they last longer before needing replacement and c) they far consume less power. The later point being a minor factor in the decision to upgrade the old radio (See later). Having looked around the internet, the site I chose was " Classic Car LEDs " (here is the  Link ). They offer a complete set of LEDs for the Stag and their website had some good feedback regarding customer service. A parcel arrived a couple of days later. Carefully wrapped and labeled with each of the bulbs identified - even down to using a coloured marker pen to identify which LED was to be used for each of the console warning lights. Excellent service. As I needed to clean the dial rims and the walnut dash behind the dials, to get rid of what looked like 40 years of grime. I decided to replace the bulbs systematically dial by dial as I remove

Cockpit Refurb

Image
Having removed the carpets and the seats I can now fully see the state of the floor panels. Drivers side looks fine and I suspect has been replaced before although it's difficult to tell since the inner and outer sills also look like they have been replaced (lots of welding scars).  In order to add a few more years of life to the drivers side floor panels I have cleaned  them down, covered them in rust proofing agent ( Rustbuster Fe-123), and then a coat of white  Rustbuster Epoxy Mastic EM121. Looks much better and should give better protection. In time I will do the underside in a similar way. The passenger side floor is another story. It has a number of molded sound deadening sheets which are keeping it structurally intact and I suspect forming a base for large amounts of underseal underneath to disguise the rot. Rather than rubbing down, sealing and painting this side of the floor I have decided to get it replaced. I have found a local welder and sourced the front and rear

More Electrical Gremlins

Image
As you may have read from my previous posts, a historical rebuild / refurb of this car has introduced some electrical gremlins. Whilst investigating why the battery totally discharged every few days I noticed that there was considerable spurious wiring hanging out of the dash for a) a radio which wasn't fitted b) a rocker switch fixed to the centre console for something or other - unknown. There was also missing bulbs in the dash and issues with non functioning interior lighting, not to mention a random indicator that seems to make it's own mind up whether it works or not. So whilst I was waiting for some paint to dry I decided to investigate and remove the spurious wiring.  Got a little carried away. Now it's all in bits I will put it back together with a little more care than the last time, check and test all of the wiring and replace with LED in the dash and interior - might even do the the indicators as well. The more I look into the electricals the more I need

Front Seat Refurbishment

Image
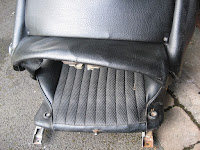
43 years have taken their toll on the padding of the front seats. Whilst the structure/frame was sturdy and robust, the bolsters were non-existent and had collapsed. There was also evidence of rust to the rails and the seat frame. So, new fillers were purchased from Mr Rimmer and I started to open up the first seat to see what was inside...... As there are no issues (other than dirt) with the vinyl covering, I carefully removed each of the many retaining clips that hold the fabric to the frame. What I found in there was disgusting. The foam had completely disintegrated in the bolsters and stank!! With the aid of rubber gloves and a razor blade, I parted the vinyl from the padding. Not easy, as the padding had been glued to the vinyl and was still firmly attached even after all of this time. It was also complicated by the need to disassemble the seat frames in order to remove the vinyl in a way that it could be re-used.  I ended up with 3 pieces of frame: the runners, the seat base a

Alternator Problems

Image
I t's been a few weeks since I have had any time to work on the Stag. It's been a very busy time at work - the culmination of 2 years work successfully delivered at the end of June 17. So now it's time to take a breath and get back into the garage. The last few weeks have benefited from some very warm, dry weather - perfect for the old Stag. I have had the Stag on the road a few times with the hood down listening to that intoxicating burble. But, every time I get into the car after it has stood for a few days, the battery is flat. As there is now radio or clock at the moment, then this is a little puzzling. Once started the, voltage reading climbs up to 16.5v (as I would expect if the battery was very low) but it stays there and doesn't drop back as I would expect after 20-30 miles. Dropped a quick query on the SOC Forum and the consensus is that the alternator needs replacing. The built in regulator is probably not functioning.  The direct replacement is the 18 ACR.